Back
June 27, 2024
Content & Media Generation
Transforming Sketches into realistic Face Images
Pfactorial
Share

Introduction
In a world where technology continues to push the boundaries of human creativity, the fusion of art and artificial intelligence invites us to explore undiscovered avenues of artistic imagination. The ability to transform simple sketches into lifelike images holds immense creative and practical potential. In this blog, we will take you into the world of generative AI, unveiling the art of transforming simple sketches into intricate, lifelike face images.

Imagine sketching a basic outline of a face on a canvas and then witnessing it evolve into a high-resolution, photorealistic image with lifelike features. This fusion of technology and artistry not only simplifies the work of artists and designers but also has profound implications for various industries, from entertainment and gaming to forensics and computer vision. The latest advancements in deep learning-based image-to-image translation techniques have enabled the automated generation of these kinds of face images. Now we are going to discuss about such a model and its implementation
Model architecture
The deepface model uses a combination of local and global structures to create realistic faces. Here we focus on modelling the shape variation of different parts of the face. It allows capturing detailed features and making precise edits to the face components. To train this network , we need a good amount of data consisting of pairs of sketches and face images

This system consists of three main modules.
CE (Component Embedding)
Here, breaking down a sketch of a human face into five main parts: the left eye, right eye, nose, mouth, and everything else in the remainder. To make sure the model captures all the details in these components, it uses auto-encoders. It learns how to describe each part of the face. There is one auto-encoder for each of the five components.
FM (Feature Mapping)
The FM module decodes the component feature vectors to the corresponding multi-channel feature maps. Thus Each part of the face gets its own detailed map, and uses these maps to recreate the face. This module places the maps for the eyes, nose, and mouth back into the remainder of the face map, keeping the positions and relationships the same before passing them to the IS module.
IS (Image Synthesis)
To turn the combined feature maps into a realistic face image this module uses conditional GAN architecture. This architecture has a generator that takes the feature maps as input and uses them to create an image. It also has a discriminator that guides the generation process.The generator consists of several parts: an encoding part, a residual block, and a decoding unit. The input feature maps go through these parts step by step, and they help create a detailed image.
This is the basic working of the model. Now that you have a general understanding of how the model works, let's move forward and start implementing it.
How to implement the model
To implement the model, you can refer to this GitHub repository: GitHub - IGLICT/DeepFaceDrawing-Jittor .
We have different methods to implement the model. Method 1 involves setting up the environment on an Ubuntu system with an NVIDIA GPU and CUDA. You can also run it within Windows using the Windows Subsystem for Linux (WSL).Method 2 offers an alternative using Docker to run the code . However, please note that these approaches demand high memory resources.
So We've decided to opt for running the code directly in Google Colab. To begin, open Google Colab and configure the runtime to utilise a GPU. Execute every line of code within the Colab environment. Please note that, in order to execute this code, it's necessary to install the pip package within colab.
To install pip run this code in cells
Now pip is successfully installed. We can see the pip file in colab.
To install the required dependencies, execute the following commands
These commands will install Python 3.7 and the Jittor library.
Next, we need to clone the repository and then navigate to the corresponding folder.
This will automatically download pretrained models to the params folder. Comment out these lines in this script.
cd ..python3.7 test_model.py. We will execute the test_model.py file in a dedicated cell. Test_model.py contains the code to test our model. After downloading the pretrained models, we can test the model. Here, we will establish a virtual environment and obtain the necessary pretrained models and essential libraries by executing the install.sh script.

Now in the params folder all pretrained models are downloaded.
Now time to test our model . Execute test_model.py

In the test folder, you can find a collection of face sketches. Within the Test_model.py file, there's a process that iterates through these input images. During this iteration, the script configures specific parameters for each image. Additionally, it sets the gender (sex) for each image, and finally, it generates the corresponding output, saving the results within the test folder.
How to make face images from our own drawings
Now let us see how to make face images from our own drawings.
Executing this code would normally initiate a graphical user interface (GUI) that allows users to draw and create new faces interactively. However, in the context of running it in Google Colab, the GUI interface is not visible because Colab is designed for code execution and does not support the display of traditional desktop-style GUI applications. To experience the GUI, you would typically run the code on your local system, where you can interact with the graphical interface directly.
Here we can have an alternate method to test our own sketches.
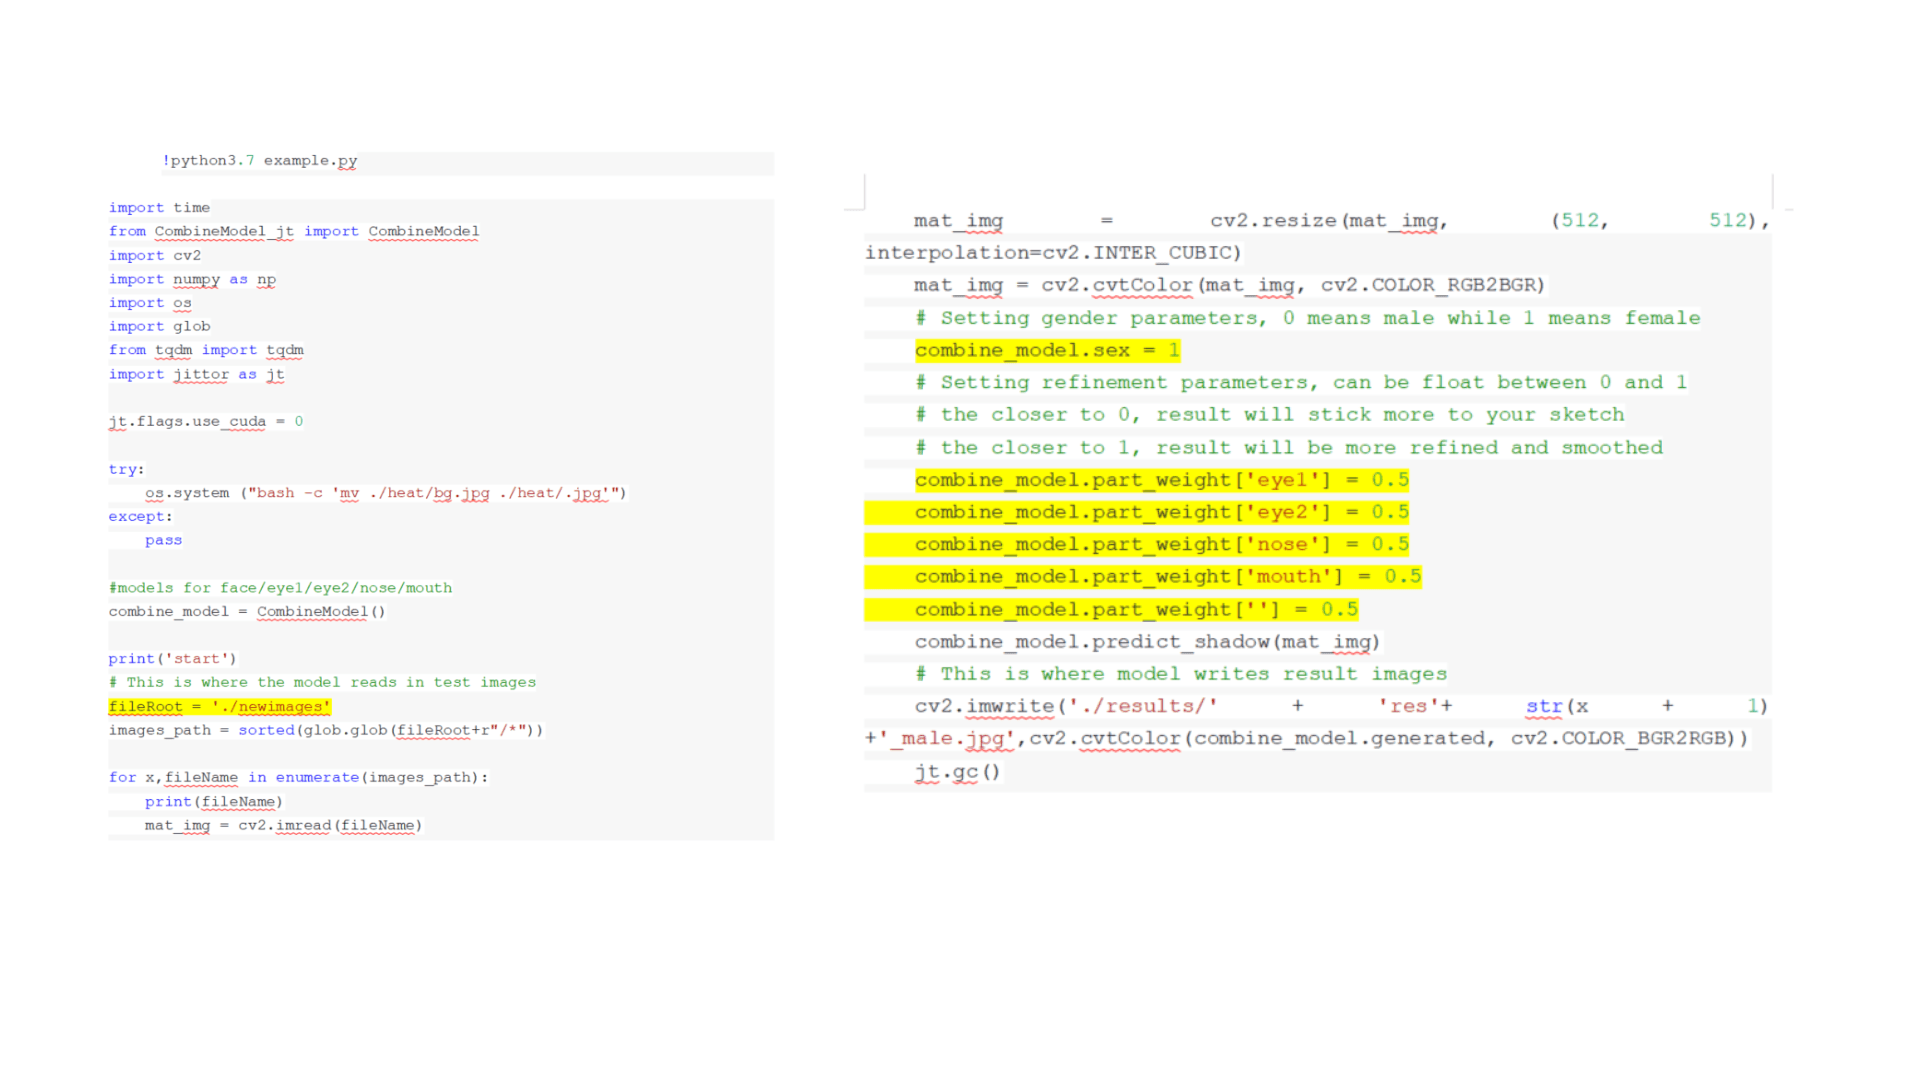
We can not change the test_model.py since it only supports less than or equal to 5 test images at once, it has pre-set component refinement parameters. so remove the original parameter matrix, and set the parameters yourself. There are in total 6 parameters (for sex, eye1, eye2, nose, mouth and remainder) we can set for one picture.
Now, we'll define parameters for our custom sketches
- First create a new folder inside the DeepFaceDrawing-Jitter folder named newimages.
- Create another folder results to store results
- Create new py file example.py inside the DeepFaceDrawing-Jitter folder
Draw sketches using paint and upload to this newimages folder
Finally Run example.py file

In this script takes input images from newimages folder . We can set parameters as we need. And sex 0 and 1 accordingly. Upon execution this will generate an output image in the results folder.
.png&w=2048&q=75)
UseCases
- Artists and illustrators can use this technology to quickly turn their sketches into detailed digital artworks. For example, an illustrator working on a graphic novel can draft rough pencil sketches of characters and scenes, and then employ this AI-powered tool to transform these sketches into vibrant, fully-rendered digital illustrations.
- Character designers can create unique characters for animation, video games, or graphic novels.
- This technology has the potential to transform verbal witness descriptions or composite sketches into accurate facial images, significantly expediting the identification of suspects in criminal investigations, ensuring law enforcement can swiftly generate visual representations that aid in solving crimes.For instance, a witness describing an individual's features can have their details rapidly translated into a detailed image, allowing law enforcement to disseminate visual information to the public and generate leads for solving cases more efficiently.
- In Advertising and Marketing,Advertisers can use this to create eye-catching and personalised ad campaigns.
We've been inspired by real-world applications and case studies, where generative AI has left its indelible mark in art, design, and even forensic sketch generation. It has redefined creativity, allowing the amalgamation of human ingenuity and machine learning algorithms to create art and innovation beyond our dreams.